Did you know that your roof already comes with free rails? You can mount PV directly to the roof panels themselves - using the “direct-attach” method. Whether you are dealing with standing seam or ribbed, face-fastened panels, these metal roofs have one thing in common: They all have built-in rails.
%20built%20right%20in%20ready%20for%20direct%20attachment%20of%20solar%20panels.png?width=319&name=S-5!%20Standing%20seam%20metal%20roofs%20have%20rails%20(the%20seams)%20built%20right%20in%20ready%20for%20direct%20attachment%20of%20solar%20panels.png)
(See image to the left: Standing seam metal roofs have rails (the seams) built right in ready for direct attachment of solar panels.) This integrated [and cost-free] feature makes solar mounting quick and convenient. The “direct-attach” method utilizes clamps or brackets and a grab system to marry the module to the clamp or bracket that is mounted directly to the built in rails.
 How Do I Choose the Solar Mounting System for My Project?
We’ve put together a series of questions in five categories to help evaluate whether your project would be best suited for railed or rail-less solar mounting. Download the quick guide version to use on your next project.
Interested in a specific category? Jump to the one you want to read first by clicking below.
 |
 |
|
 |
 |
What Are 5 Things to Consider When Mounting Solar Panels on a Metal Roof?
DESIGN AND STRUCTURAL CONSIDERATIONS
Are You Thinking You Might Need to Tilt Your Solar Panels?
These questions cover the need for tilting, wind factors, obstacles and module orientation.
|
Rail |
Rail-Less |
|
|
Do you want to tilt your panels? |
Rails (and racking) allow system tilting to maximize sun exposure. |
Rail-less systems directly attach to the seams of the metal roof and therefore do not allow panel tilting. But the premium cost of tilting modules in today’s solar economies is rarely justified by output increase. |
|
Do you have any potential obstructions on your roof that may hinder sun exposure? |
Rails generally come pre-cut to length; however, to position around roof obstructions, you may need to do some field-cutting. |
With rail-less systems, you determine where you want the panels to be located, softening the need to compensate for irregular roof areas. You can also potentially change install area on the fly to compensate. |
|
Module orientation— Portrait or Landscape? (See diagrams below). (If you are wondering…it doesn’t matter). |
You may be stuck on the notion that modules are only to be mounted in portrait orientation. Why? – Because it puts the module’s long side perpendicular to the rails that run East-West. Portrait is required for rails. |
The “free” rails of a metal roof (ribs or seams) run up and down (North-South). This means the modules are now installed in landscape orientation – but still 90° to the rails, so grabs are on the long side. Landscape is required for rail-less. |
|
Do you need to consider high wind factors? |
If more than 2 points of module attachment are required to meet wind uplift requirements, you will need to add more rails. |
Direct-attach will allow for extra points of attachment of the modules with the simple addition of another clamp/PVKIT. |
|
Do you want to install your panels without voiding your roof warranty? |
S-5! clamps work with rail systems. You can attach clamps to your standing seam roof and then mount rails on top of the clamps. Roof warranty remains intact. |
S-5! clamps work with rail-less systems. The PVKIT serves as the clamping/grounding interface between the roof and the module. Roof warranty remains intact. |
|
Are you concerned with the added dead load to the roof structure of solar array? |
Rail mounting will generally add 18-20 lbs. (8.2-9.1kg) per kWp (to the weight of modules and wire). |
S-5 direct-attach generally adds 2.6-3.0 lbs. (1.2-1.4kg) per kWp (to the weight of modules and wire). This is an 80%± weight savings. |
Module Orientation
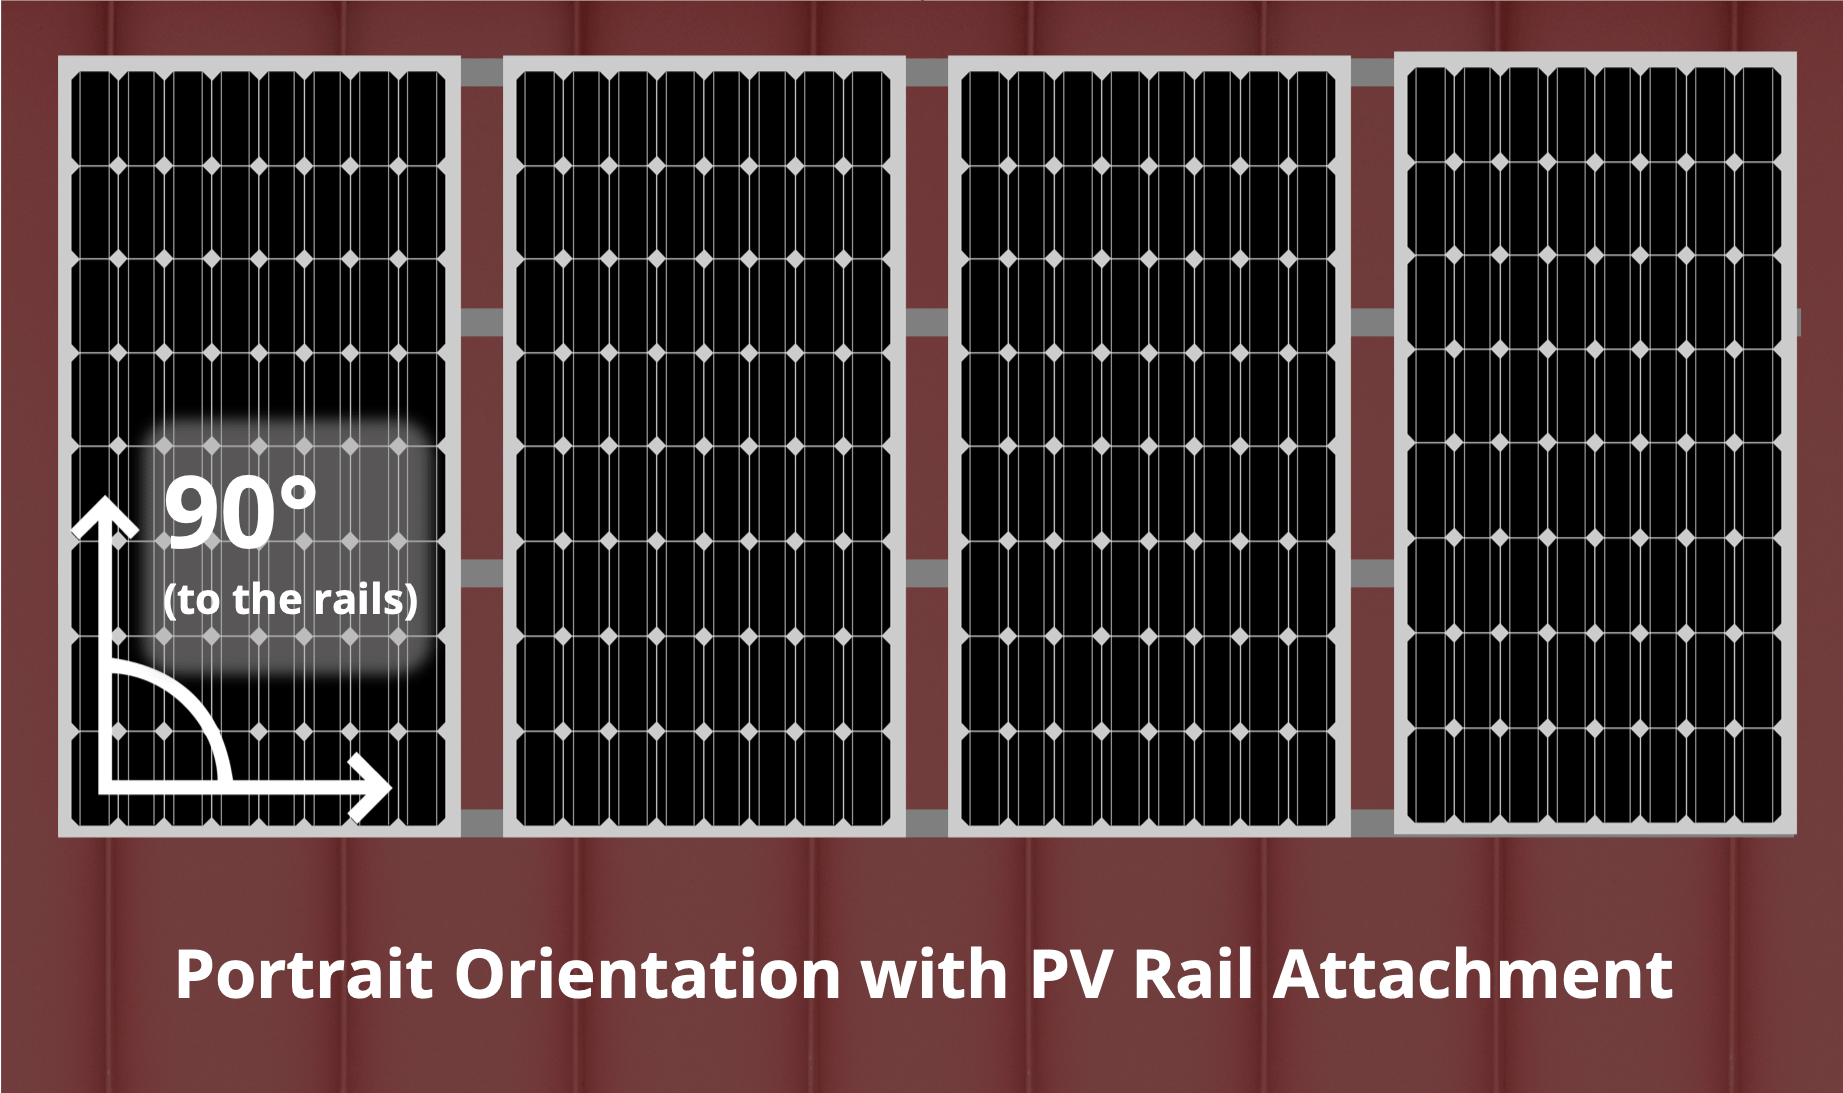
(Portrait Orientation with PV Rail Attachment)
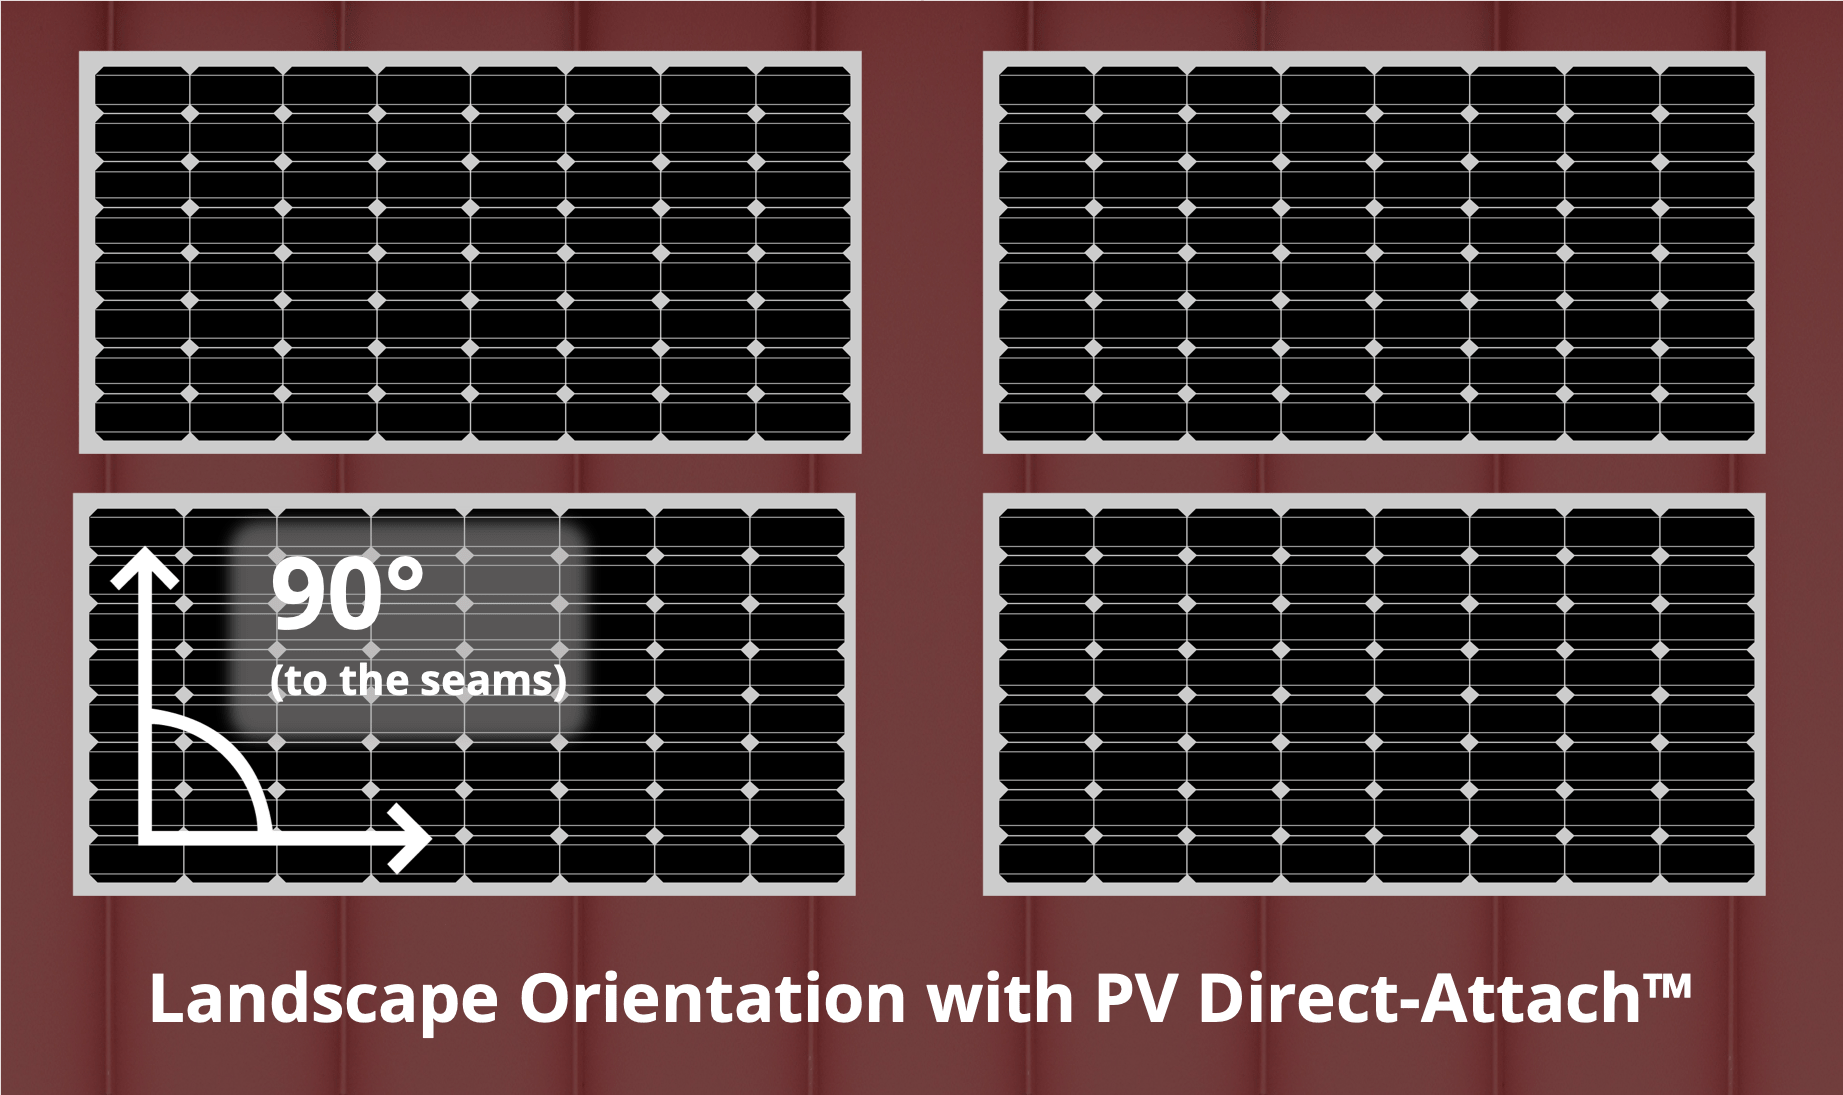
(Landscape Orientation with PV Direct-Attach™)
Can you save going rail-less?Read our solar project cost breakdown blog post. |
.png?width=327&name=S-5!%20Save%20up%20to%2050%25%20with%20Rail-Less%20Mounting%20(Direct-Attach).png)
|
AESTHETICS
How to Choose a Solar System Design
There is no way to hide a solar array. And for some, high visibility may actually be a top consideration. But either way, a higher profile does NOT always correlate with better module performance. It comes down to personal preference and desired “roof look”.
|
Rail |
Rail-Less |
|
|
Are you installing on a new roof or retrofitting an old one? |
You can retrofit an old roof or install on a new roof. |
You can retrofit an old roof or install on a new roof. |
|
Are you concerned with wire management? |
You must pre-lay out your wires before you begin panel installation. No significant cost savings over rail-less. |
May save time during staging process because you can clip the individual wires as you install each module. No significant cost-savings over rails. But you do save time. |
|
Is the existing roof surface reasonably true-to-plane? |
An advantage of rail-mounting is that you can compensate for humps and valleys in the roof substrate. This may be needed on older construction where excessive settlement has occurred. |
Steel frame and newer wood frame structures are usually true-to-plane. With a few exceptions, direct-attach (rail-less) systems do not enable height adjustment, so if the substrate is really wonky, consider rail. |
|
Module height (see diagrams below for additional information) |
Rails provide a higher profile system, but how high is high enough for optimal air flow? The higher you install the more wind uplift effects are aggravated. (*See note below). |
Rail-less offers a sleek, lower profile while still ensuring optimum air flow. S-5! direct-attach mounting solutions generally place module (cells) at least 4” (100mm) above the roof. (*See Performance note below). |
*An important note about module height and performance:
You want to make sure you have proper air flow below and between your panels. When you do this, you improve module efficiency. Efficient air flow helps cool the modules. The diagram below illustrates the S-5! rail-less mounting height as it relates to typical standing seam and exposed-fastener metal roof heights.
*Higher Profile Solar Systems Do Not Increase Performance
When considering optimal air flow under your modules, it is important to note that the performance of the solar cell does not increase with any significance once the module glass is 4” (100mm) above the roof. This means the module will be no cooler regardless how much above 4” you install it off the roof.
Seam Heights and Mounting Hardware
The seam of SSMR is typically 1.5” to 3” in height. The mounting hardware adds another ¾”(±), and the module frame another 1.5” (±). The cells then are at 3.75” to 5.25” from the roof’s surface. This ensures adequate air flow to optimize module output. See diagrams below that illustrate standing seam and exposed-fastened applications.
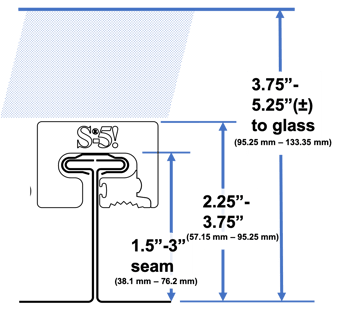
(Standing seam metal roof seam heights and S-5! mounting hardware heights ensure adequate air flow)
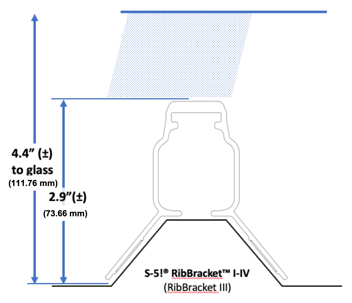
(Trapezoidal rib metal roof seam heights and S-5! mounting hardware heights ensure adequate air flow)
What Does a 150 Module Layout Look Like for Each Mounting System?
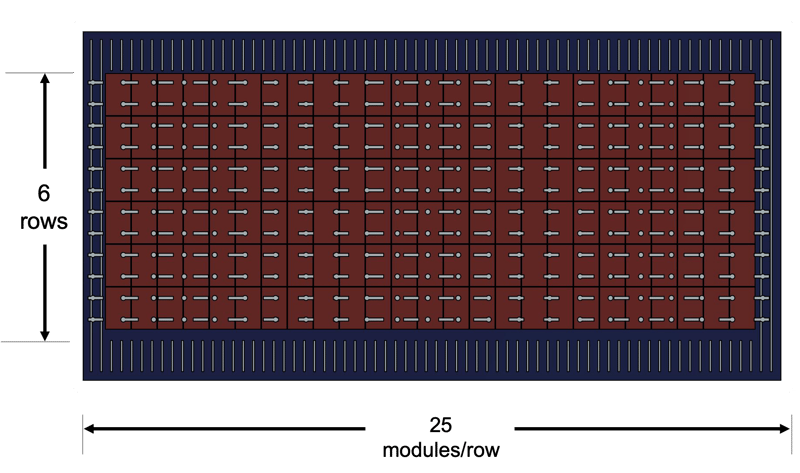
(150-Module Layout for Rail System with S-5-V Mini Clamp)
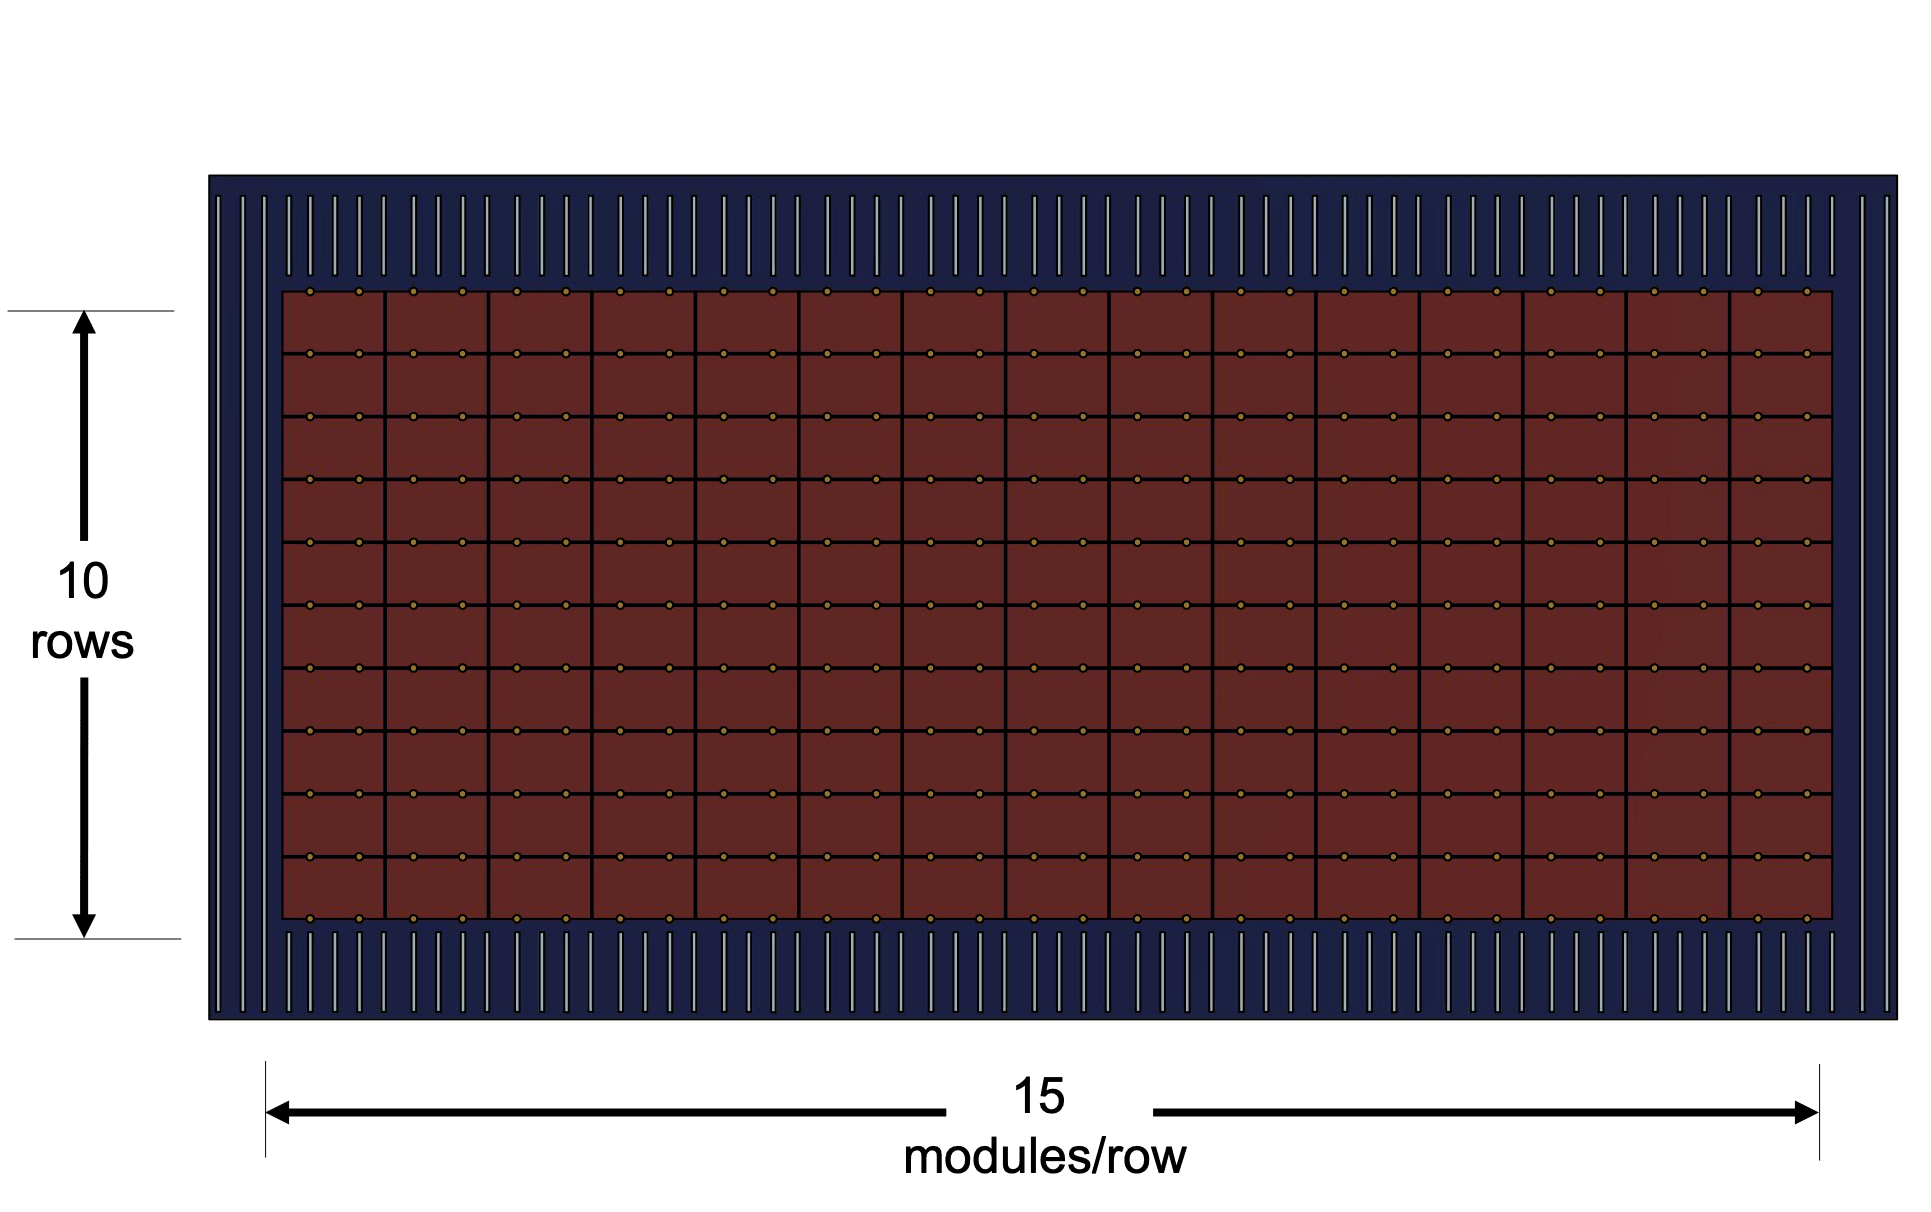
(150-Module Layout for Direct-Attach with S-5! PVKIT)
LOGISTICS
How Can You Lower Shipping and Handling Costs for Your Solar Project?
Getting project materials to the actual jobsite and on the roof are often overlooked aspects in the amount of real-time and money that they cost. Cost considerations include freight, unloading costs, storage space, shipping to site, additional equipment and more.
|
Rail |
Rail-Less |
|
|
How is shipping handled? |
A 50kW system would require around 970 lbs. (440kg) of rail. Other shipping concerns:
|
A 50kW system would require about 150 lbs. (68kg) of parts. Other shipping concerns:
Clamps and PVKITs are a fraction of the weight and also a fraction of the space – so they don’t require a freight truck
|
|
Do I need to store my parts before the project starts? |
Will you need a crane or forklift to lift materials up on the roof? |
No special equipment is needed. You can carry the clamps and direct-attach components up to the roof in a bucket. |
|
Want to reduce shipping costs, material handling and logistics? |
Rails can be long, heavy and cumbersome. Transport from producer, then to project, then to roof (unloading, reloading, etc.) |
S-5 direct-attach for a 10kW job weighs about 30 pounds (24kg), and fits in your Mini Cooper. Then you only need to carry them up the ladder! |
INSTALLATION
How Can You Make Solar Panel Installation Faster?
Your parts have been shipped for your project. But where did you have them shipped? And what about needing additional heavy equipment for the install?
|
Rail |
Rail-Less |
|
|
Do you want to avoid field cutting and fitting at hips, valleys and dormers? |
Most rail producers offer pre-cut rails, but some field cutting at irregular roof areas may be required. |
Direct-attach does not utilize rails, so you locate modules as conveniently as you desire without field modifications. |
|
Will you need to store materials off-site or on-site? Remember it costs money every time you have to move materials and/or equipment. |
Here are some of the things to consider with material storage: First, you pay the commercial freight. It often has to be trucked on a flatbed because of length and weight. Next, you unload it, either at the yard or your place of business. You may be able to do this by hand, but might need a forklift. You also don’t want to damage any of the materials. Then, you reload the materials by hand or heavy equipment and take it to the job. And unload at jobsite. Will you need a crane or forklift to get the material on the roof? You may also need additional equipment to field cut/trim the rails to length at valleys, etc. |
Here are some of the things to consider with material storage: You need to pay freight, but it will cost far less than shipping rail. You can ship the parts via UPS in around 3 days – to wherever you want. A 50kW job takes only 3 or 4 cubic feet of space and weighs around 150 lbs. (e.g. 3 boxes by UPS). If you do ship to your place of business, you can often transport them to the jobsite in the trunk of a car (depending on the job size). To get the parts on the roof for any typical residential job, you can carry them in one trip up the ladder along with a screw gun. |
|
What equipment will you need to unload the materials? |
A 500 kW project will require almost 5,000 lbs of goods. Will you need to rent a crane or a forklift—or both? |
A 500 kW project will require about 1,500 lbs. of goods (1 skid), so you may want a forklift. Individual boxes are about 50 lbs., so you could also unload by hand. |
|
Do any of your parts come pre-assembled? |
Rack and rail system components are purchased separately. You buy individual rail, roof clamps, splice connectors, end caps, bolts and nuts, L-Feet and module clamps. Wires, inverters, conduit, solar panels, etc. are all purchased separately. |
Some direct-attach systems come pre-assembled. Further time is saved pre-assembling the clamp to the direct-attach system before you go up on the roof. Wires, inverters, conduit, solar panels, etc. are all purchased separately. |
COST SUMMARY
What is this Going to Cost Me?
The two most important aspects of installing solar (or any project for that matter) are time and money. But don’t just consider material costs. Total REAL cost should include the whole bill of materials, the shipping and transportation of the materials both before and after delivery as well as any cost to get them on the roof.
|
Rail |
Rail-Less |
|
|
What is the approximate shipping cost for materials? (i.e. rails, clamps, and other transportation of the material) |
Complete your bill of materials and add shipping costs to ensure your project cost estimate is accurate. Then look at labor – cost and time. |
Complete your bill of materials and add shipping costs to ensure your project cost estimate is accurate. Then look at labor – cost and time. |
|
What is the approximate kw cost for mounting hardware including freight? |
With our sample project, the rail system including commercial freight is $122.86 per kWp. |
With our sample project, the rail system including commercial freight is $68.34 per kWp. |
Start Planning Today
Materials play an important role in total costs. With rails, you may use fewer clamps, but loads into the roof are not as well distributed. With direct-attach, the overall weight of your system, logistics and shipping hassles - off and on the roof - are much less, so you can save significantly more.
Use the Checklist to See How Much You Can Save
Your costs will vary according to the size of the system, module layout and your specific vendor chain. But once you have these basics in place, you can work your way through the checklist. This will help guide your project strategy through layout, design, cost, project logistics and aesthetics, getting you on and off the roof in the most efficient way possible. Download the checklist here.
Time is Money
Then decide whether a railed or rail-less solar system is right for your project. Consider shipping, material transportation to the site, and any additional lifting equipment you might need. Railed and tilted rack function seamlessly with S-5! clamps or brackets on any standing seam or exposed-fastened metal roof profile. S-5! offers a variety of options for flush rail mounting including SolarFoot™, VersaBracket™ 47, VersaGard™ and ProteaBracket™.
For rail-less, S-5! offers the PVKIT®. A single tool drives the top bolt and the kit comes pre-assembled with either a MidGrab or EdgeGrab to ease installation. The PVKIT is compatible with all of our clamps and the following brackets: ProteaBracket™, VersaBracket™ 47, RibBracket™ I-IV and CorruBracket™.
Have technical questions about your solar mounting project?
Contact Technical Support at support@s-5.com or call us at (888) 825-3432.